Scanning a document digitizes an image of a printed page,
but doesn’t digitize the text on that page: you can’t search
for a keyword or copy a relevant passage into another document. Optical
Character Recognition programs interpret the scanned images, “see” the
individual letterforms, and overlay that textual information over the
image (a PDF “text layer”) so you can search and copy-paste the scanned
document to your heart’s content. For example, search for “asymmetry” in
this scanned page before and after OCR.
Adobe would love to charge you for OCR (built into Acrobat), but the
best-in-class OCR engine — Google’s Tesseract, initially developed by HP
in the 1980s — is free and open-source.
The issue is the interface: rather than being an end-user program
like Acrobat, Tesseract is a tool for building an end-user program. My
favorite program, OCRmyPDF, is a
little better: it’s designed for end-users, but only end-users
comfortable working at the command line.
Rather than navigating folders and running OCRmyPDF from Terminal,
you can use Apple’s built-in Shortcuts
(available with macOS 12 Monterey and later) to run OCR by
right-clicking on a PDF in Finder.
Install OCRmyPDF
Unfortunately, this setup is a two-step process. Unlike an app you
can download form the App Store or an installable *.pkg
file you download and install from the internet, OCRmyPDF is distributed
via a common macOS package manager, Homebrew.
First you install Homebrew, then you use Homebrew to install
OCRmyPDF.
You can install both from the command line, the most ancient way to
interact with the machine you know and love. You might be used to
mouse-navigated apps with buttons and menus; at the command line there’s
nothing but text.
You type instructions (commands) and press enter to run
them; as long as they’re cogent, the computer will obey! Below I’ve
included the specific commands to run this way.
Open the application Terminal. You can search
for it in Finder or find it at Applications → Utilities →
Terminal.
Install Homebrew if you don’t have it.
To check if you already have Homebrew installed, type
which brew into Terminal and press enter. If you
see an output like /opt/homebrew/bin/brew, you have
Homebrew installed and you can proceed to step 3.
If you see an output like brew not found, install
Homebrew by copying the “Install Homebrew” command listed on brew.sh into your Terminal and pressing
enter. As that installation process runs, it may prompt you
for additional input or approval. You may also need to input your
computer password.
Once Homebrew is finished installing, confirm the installation: type
brew --version into Terminal and press
enter.
Install OCRmyPDF: type
brew install ocrmypdf into Terminal and press
enter.
It’s worth briefly touching on how to use OCRmyPDF from the Terminal.
At any given time, the Terminal is operating in a certain folder on your
computer — you can use the command pwd to see what folder
you’re in, the command ls to list files and child folders
from your current position, and the command cd to move into
another folder.
When you’re in a folder with a PDF — let’s call it ‘my-scan.pdf’ —
running ocrmypdf my-scan.pdf my-scan_ocr.pdf creates a new
PDF (my-scan_ocr.pdf) with the same pages as my-scan.pdf, but with the
searchable and copyable PDF text layer added.
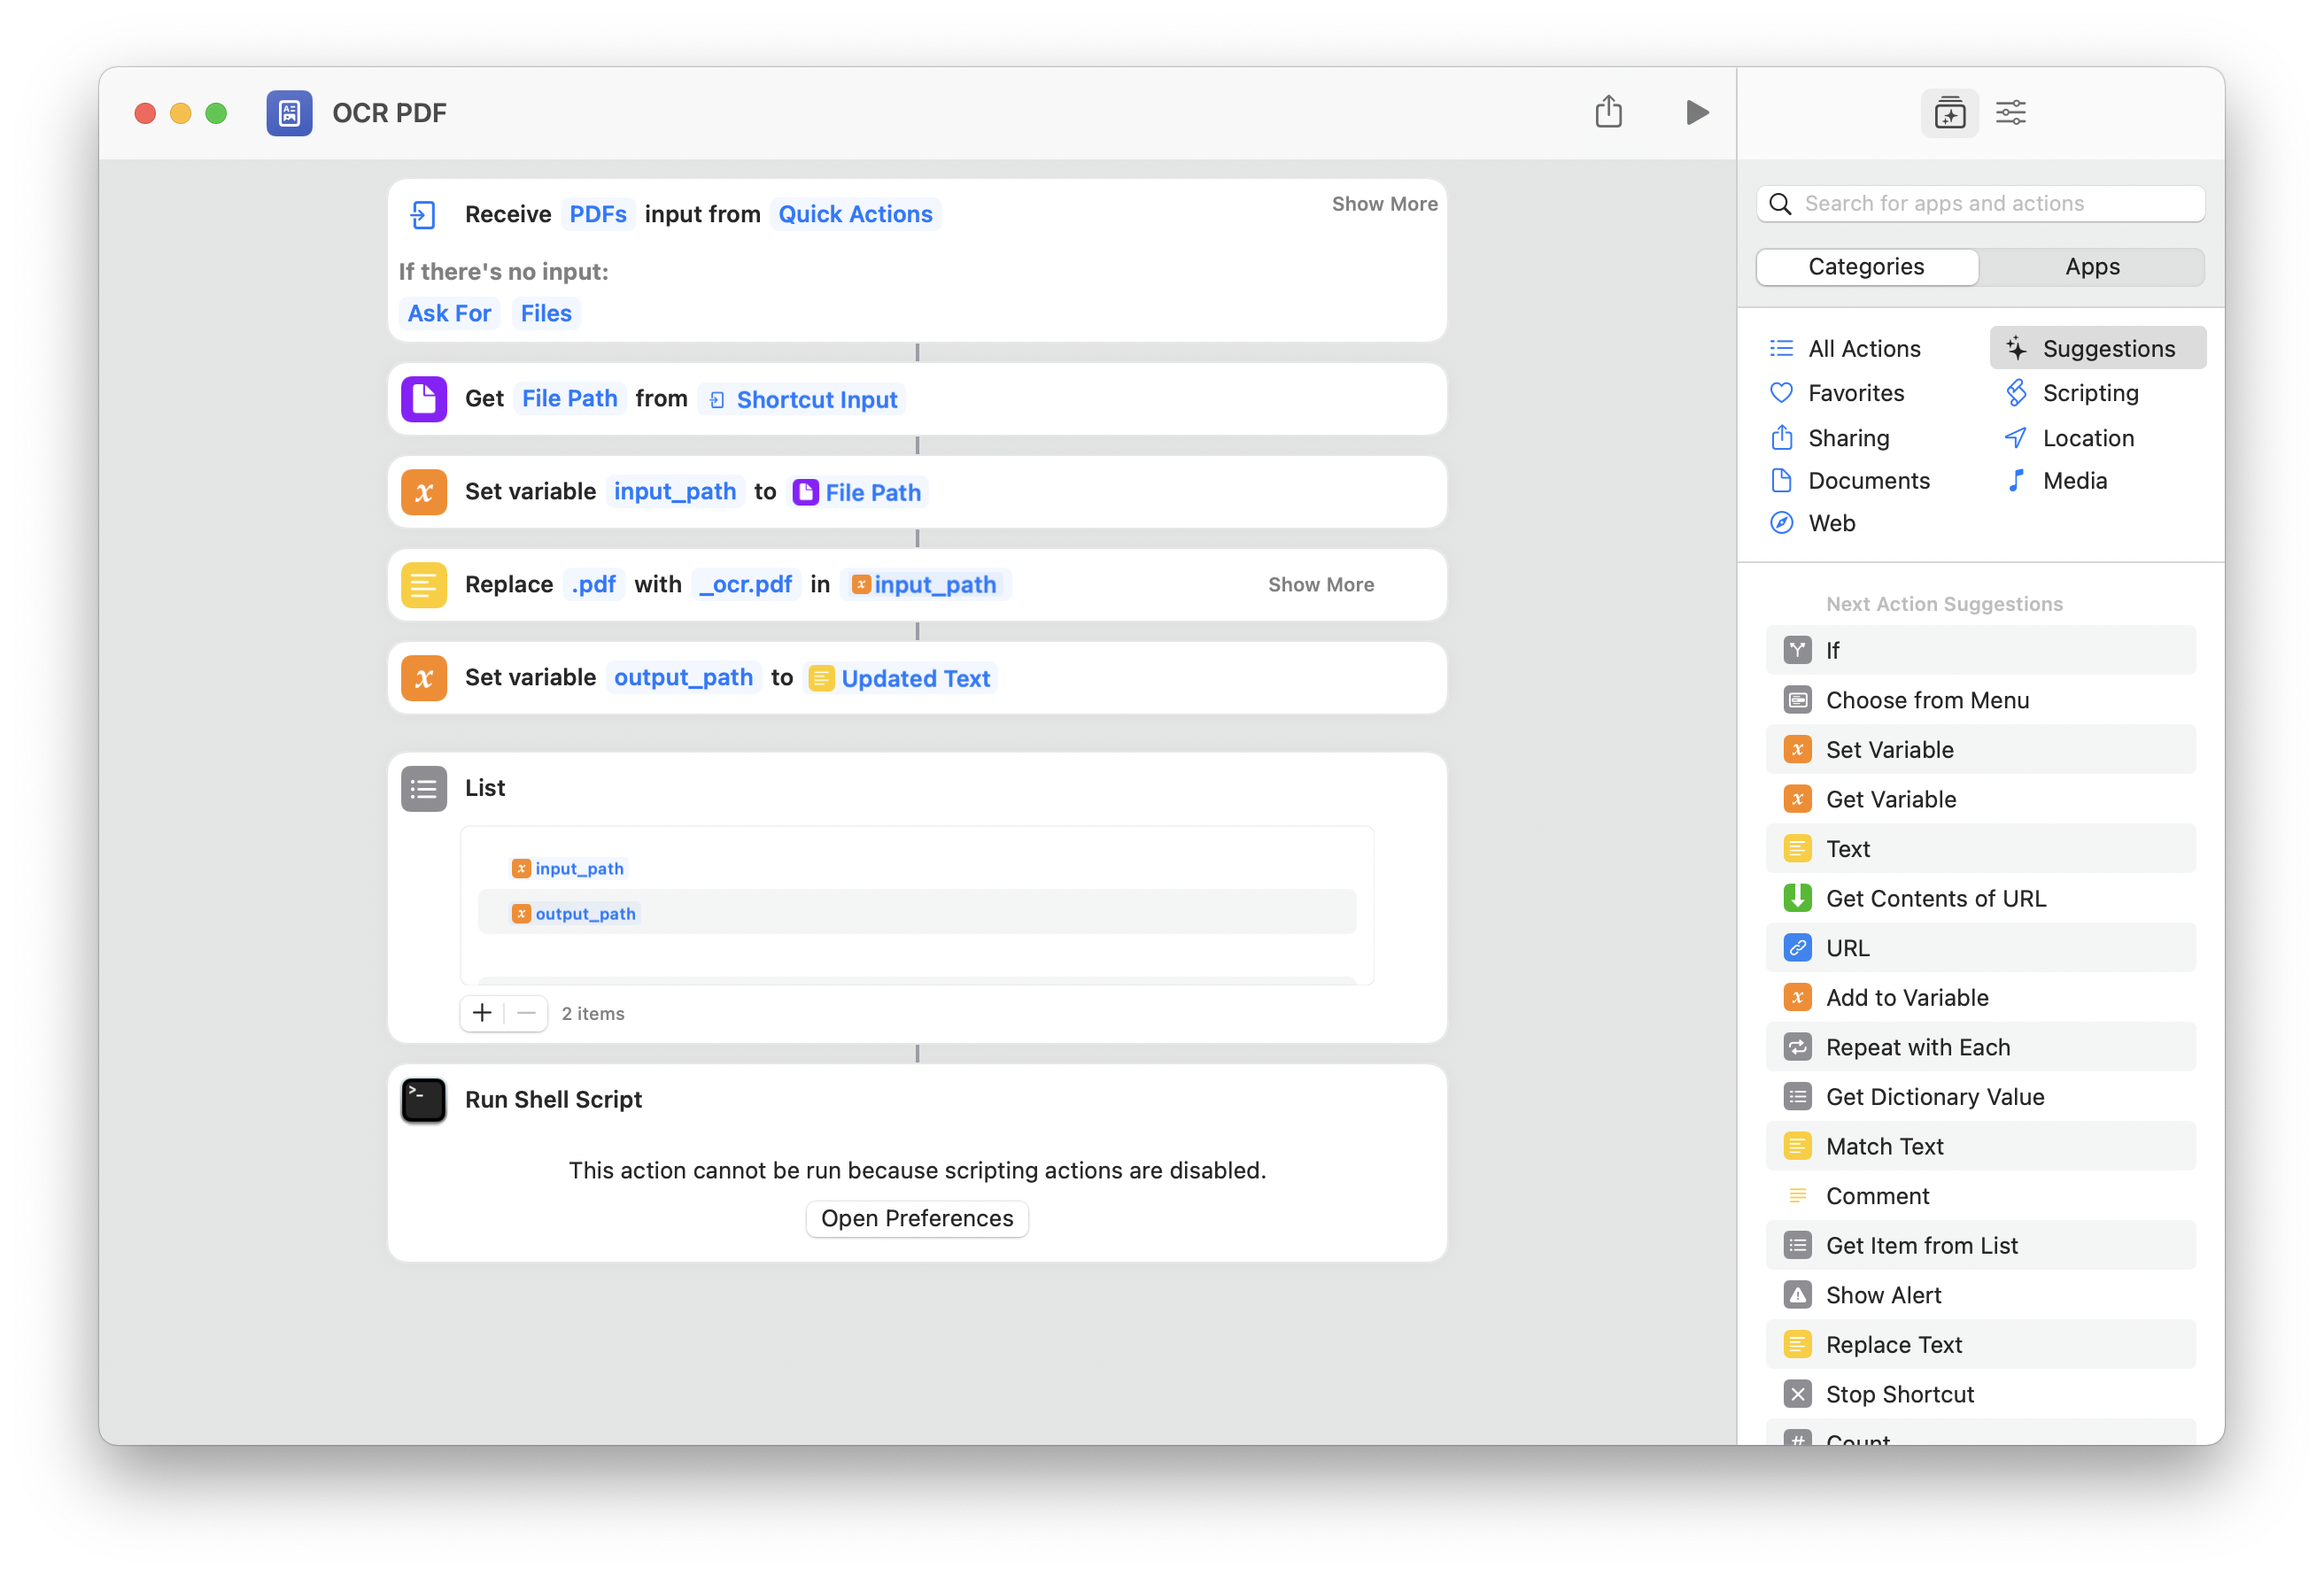
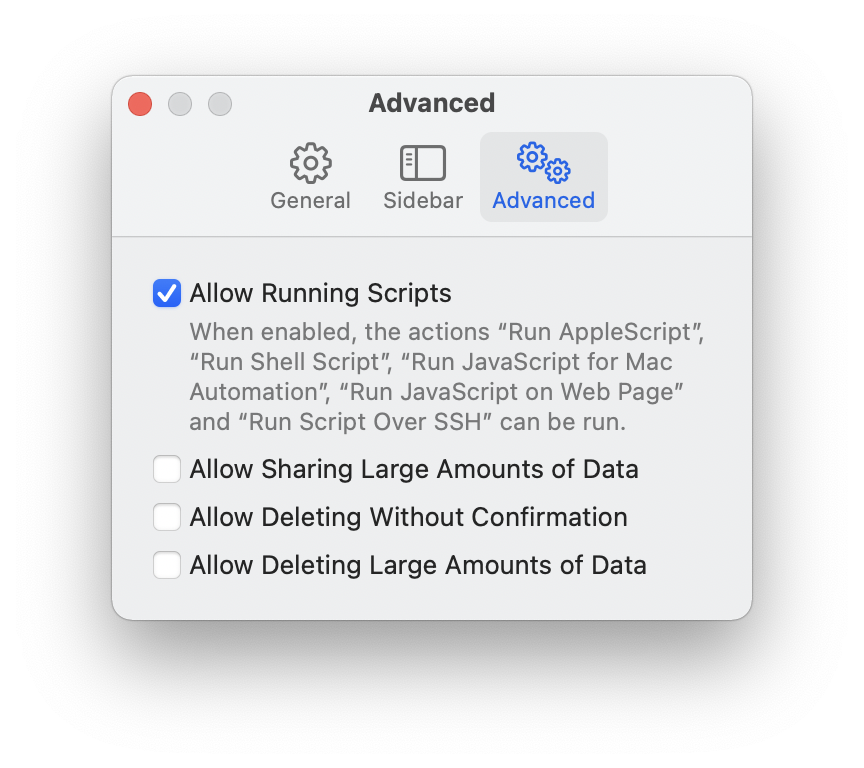
The last action, “Run Shell Script,” may come with a warning
message: “This action cannot be run because Scripting actions are
disabled.” Hit the ‘Open Preferences’ button, then ‘Allow Running
Scripts.’
The “Run Shell Script” action is disabled
by default. Click the “Open Preferences” button.In the Preferences pane, check “Allow
Running Scripts” to allow the shortcut to run OCRmyPDF.
Diving into advanced settings to toggle off a security-minded default
might reasonably make you nervous: shell scripts are powerful tools, so
in theory ‘Allow Running Scripts’ could let a malicious shortcut
manipulate your computer. The good news is this script is
short: it only runs OCRmyPDf, which is
trustworthy.
Use the button in the upper-right-hand corner of the Shortcuts
window to navigate to the ‘Shortcut Details.’ Check ‘Use as Quick
Action’ and ‘Finder’ to add the “OCR PDF” action to your right-click
menu.
‘Use as Quick Action’ and its sub-option
‘Finder’ are checked in the right-hand panel.
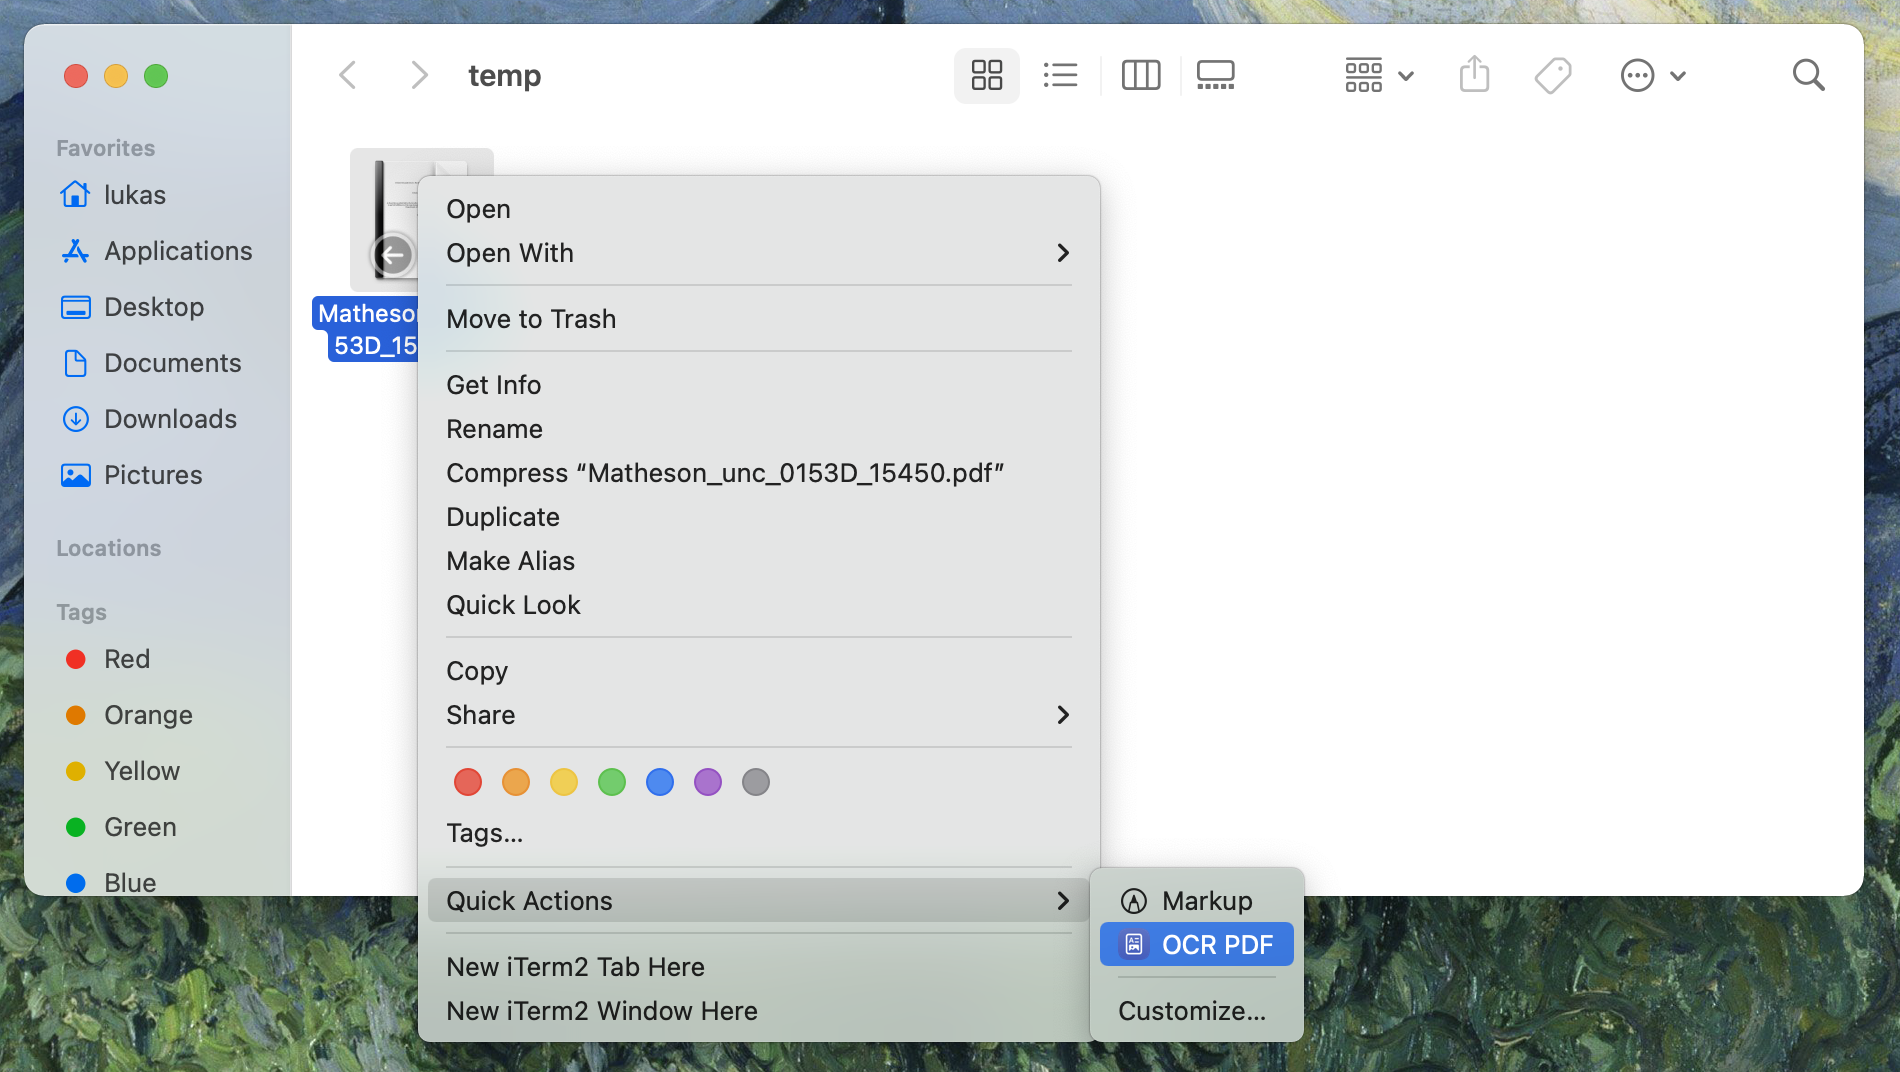
Now you can run OCRmyPDF from Shortcuts! Use the ‘Play’ button in the
upper-right of this window (it’ll prompt you to select a PDF)
or right-click on a PDF and use Quick Actions → OCR PDF.
The final product: make a PDF searchable
by right clicking on it.
While your PDF is being processed, you’ll see a Shortcuts status
indicator in the menu bar at the top of your screen. When it’s finished,
look for a freshly OCR’d PDF in the same folder as the one you selected
(if you right-clicked on ‘my-scan.pdf’, expect ‘my-scan_ocr.pdf’). This
can take a few minutes for large files.
In retrospect, I wish I’d used OCR much more in college, when my
course readings were often chapters scanned from university library
books. I imagine it’s also a useful tool for working with big and
relatively low-tech corpuses, like public records. Sure, a university
student or a public records professional might have an institutional
Adobe license, but we should expect more!
This technology has been in development since the mid-80s, and free
for almost 20 years… if you’re the right kind of computer-user,
comfortable writing your own scripts and troubleshooting at the command
line. A consumer low-code app like Shortcuts, by providing a generic
graphical interface for shell scripts, extends the same options to a
wider range of users.